Thursday, June 27, 2013

Connecting ListView with DataBase

ListView can be populated by ArrayAdapter, Custom Adapter, ArrayList etc
In this post I will describe how to populate ListView with database.

Have a look at my previous post
Populating ListView with Custom Adapter
Populating ListView with ArrayList


ListView with DataBase Example


In this example I have created a listView  and populated it with DataBAse.
Each of the ListView item contain two views
TextView SMS Sender : to show SMS Sender Number
TextView SMSBody : to show the SMS Body/content

Here the ListView shows the all the SMSes with Sender Number and SMSBody.


Add the following permission in your manifest file to read the SMS..
   <uses-permission android:name="android.permission.READ_SMS"/>
   <uses-permission android:name="android.permission.WRITE_SMS"/>


listview_activity_main.xml


<LinearLayout xmlns:android="http://schemas.android.com/apk/res/android"
    android:layout_width="match_parent"
    android:layout_height="match_parent"
    android:background="#D1FFFF"
    android:orientation="vertical">
   
   
    <ListView
        android:id="@+id/listViewSMS"
        android:layout_width="fill_parent"
        android:layout_height="fill_parent"
        android:dividerHeight="0.1dp"
        android:divider="#0000CC"
        >
    </ListView>
   
  </LinearLayout>


listview_each_item.xml


<?xml version="1.0" encoding="utf-8"?>
<LinearLayout xmlns:android="http://schemas.android.com/apk/res/android"
    android:layout_width="match_parent"
    android:layout_height="match_parent"
    android:orientation="vertical" >

    <TextView
        android:id="@+id/textViewSMSSender"
        android:paddingLeft="2dp"
        android:textSize="20dp"
        android:textStyle="bold"
        android:textColor="#0000FF"
        android:layout_width="wrap_content"
        android:layout_height="wrap_content"
        android:text="TextView" />

    <TextView
        android:id="@+id/textViewMessageBody"
        android:paddingLeft="5dp"
        android:textColor="#5C002E"
        android:textSize="17dp"
        android:layout_width="wrap_content"
        android:layout_height="wrap_content"
        android:text="TextView" />

</LinearLayout>
   
  </LinearLayout>


ListViewWithDatabaseActivity 


public class ListViewWithDatabaseActivity extends Activity
{

   
        ListView listViewPhoneBook;
        Context context;
         @Override
        protected void onCreate(Bundle savedInstanceState)
         {
                 super.onCreate(savedInstanceState);
                 setContentView(R.layout.listview_activity_main);
                 context=this;
                 //get the ListView Reference
                 listViewSMS=(ListView)findViewById(R.id.listViewSMS);
                

                  //arrayColumns is the column name in your cursor where you're getting the data 
                  // here we are displaying  SMSsender Number i.e. address and SMSBody i.e. body

                  String[] arrayColumns = new String[]{"address","body"};
                  //arrayViewID contains the id of textViews
                  // you can add more Views as per Requirement
                  // textViewSMSSender is connected to "address" of arrayColumns
                  // textViewMessageBody is connected to "body"of arrayColumns

                  int[] arrayViewIDs = new int[]{R.id.textViewSMSSender,R.id.textViewMessageBody};
                    
                    
                  Cursor cursor;
                  
                    cursor = getContentResolver().query(Uri.parse("content://sms/inbox"), null, null, null, null);
                  
                // create an Adapter with arguments layoutID, Cursor, Array Of Columns, and Array of ViewIds which is to be Populated
                  
                 SimpleCursorAdapter adapter = new SimpleCursorAdapter(this, R.layout.listview_each_item, cursor, arrayColumns, arrayViewIDs);
                 listViewSMS.setAdapter(adapter);


                 // To handle the click on List View Item
                 listViewSMS.setOnItemClickListener(new OnItemClickListener()
                {
                   
                                public void onItemClick(AdapterView<?> arg0, View v,int position, long arg3)
                                {
                                    // when user clicks on ListView Item , onItemClick is called
                                    // with position and View of the item which is clicked
                                    // we can use the position parameter to get index of clicked item

                                    TextView textViewSMSSender=(TextView)v.findViewById(R.id.textViewSMSSender);
                                    TextView textViewSMSBody=(TextView)v.findViewById(R.id.textViewMessageBody);
                                    String smsSender=textViewSMSSender.getText().toString();
                                    String smsBody=textViewSMSBody.getText().toString();
                                  
                                    // Show The Dialog with Selected SMS
                                    AlertDialog dialog = new AlertDialog.Builder(context).create();
                                    dialog.setTitle("SMS From : "+smsSender);
                                    dialog.setIcon(android.R.drawable.ic_dialog_info);
                                    dialog.setMessage(smsBody);
                                    dialog.setButton(DialogInterface.BUTTON_POSITIVE, "OK",
                                            new DialogInterface.OnClickListener() {
                                        public void onClick(DialogInterface dialog, int which)
                                        {
                                      
                                                dialog.dismiss();
                                                return;
                                    }  
                                    });
                                    dialog.show();
                                }
                               
                            });
             }
 }


ListView with Custom Adapter


Wednesday, June 26, 2013

ListView with Custom Adapter

The Android Development Tutorials blog contains Basic as well as Advanced android tutorials.Go to Android Development Tutorials to get list of all Android Topics.


Populate ListView with Custom Adapter

ListView can be populated by ArrayAdapter, Database, ArrayList etc
In this post I will describe how to populate ListView using a Custom Adapter.

Have a look at my previous post
Populating ListView with Database
Populating ListView with ArrayList

ListView with Custom Adapter Example


In this example I have created a listView  and populated it with Custom Adapter.
Each of the ListView item contain two views
TextView SMS Sender : to show SMS Sender Number
TextView SMSBody : to show the SMS Body/content

Here the ListView shows the all the SMSes with Sender Number and SMSBody.

What we need to do ..
Create a Custom Adapter
and add/set  the adapter to ListView.

Add the following permission in your manifest file to read the SMS..
   <uses-permission android:name="android.permission.READ_SMS"/>
   <uses-permission android:name="android.permission.WRITE_SMS"/>


listview_activity_main.xml


<LinearLayout xmlns:android="http://schemas.android.com/apk/res/android"
    android:layout_width="match_parent"
    android:layout_height="match_parent"
    android:background="#D1FFFF"
    android:orientation="vertical">
   
   
    <ListView
        android:id="@+id/listViewSMS"
        android:layout_width="fill_parent"
        android:layout_height="fill_parent"
        android:dividerHeight="0.1dp"
        android:divider="#0000CC"
        >
    </ListView>
   
  </LinearLayout>


listview_each_item.xml


<?xml version="1.0" encoding="utf-8"?>
<LinearLayout xmlns:android="http://schemas.android.com/apk/res/android"
    android:layout_width="match_parent"
    android:layout_height="match_parent"
    android:orientation="vertical" >

    <TextView
        android:id="@+id/textViewSMSSender"
        android:paddingLeft="2dp"
        android:textSize="20dp"
        android:textStyle="bold"
        android:textColor="#0000FF"
        android:layout_width="wrap_content"
        android:layout_height="wrap_content"
        android:text="TextView" />

    <TextView
        android:id="@+id/textViewMessageBody"
        android:paddingLeft="5dp"
        android:textColor="#5C002E"
        android:textSize="17dp"
        android:layout_width="wrap_content"
        android:layout_height="wrap_content"
        android:text="TextView" />

</LinearLayout>
   
  </LinearLayout>


ListViewMainActivity.java


public class ListViewMainActivity extends Activity
{
            ListView listViewSMS;
            Cursor cursor;
            SMSListAdapter smsListAdapter;
            Context context;
            @Override
            protected void onCreate(Bundle savedInstanceState)
            {
                    super.onCreate(savedInstanceState);
                    setContentView(R.layout.listview_activity_main);
                   
                    context=this;
                    listViewSMS=(ListView)findViewById(R.id.listViewSMS);

                    cursor = getContentResolver().query(Uri.parse("content://sms/inbox"), null, null, null, null);
                   
                    // Create the Adapter
                    smsListAdapter=new SMSListAdapter(this,cursor);
                   
                    // Set The Adapter to ListView
                    listViewSMS.setAdapter(smsListAdapter);
                    

                    // to handle click event on listView item
                    listViewSMS.setOnItemClickListener(new OnItemClickListener()
                    {
                            public void onItemClick(AdapterView<?> arg0, View v,int position, long arg3)
                            {
                                // when user clicks on ListView Item , onItemClick is called
                                // with position and View of the item which is clicked
                                // we can use the position parameter to get index of clicked item

                                TextView textViewSMSSender=(TextView)v.findViewById(R.id.textViewSMSSender);
                                TextView textViewSMSBody=(TextView)v.findViewById(R.id.textViewMessageBody);
                                String smsSender=textViewSMSSender.getText().toString();
                                String smsBody=textViewSMSBody.getText().toString();
                               
                                // Show The Dialog with Selected SMS
                                AlertDialog dialog = new AlertDialog.Builder(context).create();
                                dialog.setTitle("SMS From : "+smsSender);
                                dialog.setIcon(android.R.drawable.ic_dialog_info);
                                dialog.setMessage(smsBody);
                                dialog.setButton(DialogInterface.BUTTON_POSITIVE, "OK",
                                        new DialogInterface.OnClickListener() {
                                    public void onClick(DialogInterface dialog, int which)
                                    {
                                   
                                            dialog.dismiss();
                                            return;
                                }   
                                });
                                dialog.show();
                            }
                        });
       
            }
}


SMSListAdapter.java : The Custom Adapter


public class SMSListAdapter  extends BaseAdapter
{
   
    private Context mContext;
    Cursor cursor;
    public SMSListAdapter(Context context,Cursor cur)
    {
            super();
            mContext=context;
            cursor=cur;
          
    }
      
    public int getCount()
    {
        // return the number of records in cursor
        return cursor.getCount();
    }

    // getView method is called for each item of ListView
    public View getView(int position,  View view, ViewGroup parent)
    {
                    // inflate the layout for each item of listView
                    LayoutInflater inflater = (LayoutInflater) mContext.getSystemService(Context.LAYOUT_INFLATER_SERVICE);
                    view = inflater.inflate(R.layout.listview_each_item, null);
           
                    // move the cursor to required position
                    cursor.moveToPosition(position);
                   
                    // fetch the sender number and sms body from cursor
                    String senderNumber=cursor.getString(cursor.getColumnIndex("address"));
                    String smsBody=cursor.getString(cursor.getColumnIndex("body"));
                  
                    // get the reference of textViews
                    TextView textViewConatctNumber=(TextView)view.findViewById(R.id.textViewSMSSender);
                    TextView textViewSMSBody=(TextView)view.findViewById(R.id.textViewMessageBody);
                   
                    // Set the Sender number and smsBody to respective TextViews
                    textViewConatctNumber.setText(senderNumber);
                    textViewSMSBody.setText(smsBody);
                   
       
                    return view;
    }

    public Object getItem(int position) {
        // TODO Auto-generated method stub
        return position;
    }

    public long getItemId(int position) {
        // TODO Auto-generated method stub
        return position;
    }
}

ListView with Custom Adapter


New Advance Topics:                   Android LiveWallpaer Tutorial
Android ImageSwitcher                    Android TextSwitcher                                Android ViewFlipper
Android Gesture Detector               Handling/Detecting Swipe Events                Gradient Drawable
Detecting Missed Calls                    Hide Title Bar                                           GridView Animation
Android AlarmManager                 Android BootReceiver                       Vibrate Phone In a Desirable Pattern    
Developing for Different Screen Sizes           Showing Toast for Longer Time       Publishing your App
How to publish Android App on Google Play
Android TextWatcher                               Android ExpandableListView

 Beginning With Android
      Android : Introduction(What is Android)                                                              Configuring Eclipse for Android Development
     Creating Your First Android Project                                           Understanding Android Manifest File of your android app

 Advance Android Topics                                                              Customizing Android Views


Working With Layouts                                                                Working With Views

Understanding Layouts in Android                                                   Using Buttons and EditText in Android
Working with Linear Layout (With Example)                                     Using CheckBoxes in Android
Nested Linear Layout (With Example)                                              Using AutoCompleteTextView in Android                                                                                          Grid View
Relative Layout In Android                                                               ListView
Table Layout                                                                                   Android ProgressBar
Frame Layout(With Example)                                                          Customizing ProgressBar
Absolute Layout                                                                             Customizing Radio Buttons
Grid Layout                                                                                    Customizing Checkboxes In Android

Android Advance Views
Android Spinner                                                                           Android GalleryView
Android TabWidget                                                                      Android ExpandableListView

Android Components                                                                 Dialogs In Android

Activity In Android                                                                    Working With Alert Dialog
Activity Life Cycle                                                                    Adding Radio Buttons In Dialog
Starting Activity For Result                                                       Adding Check Boxes In Dialog
Sending Data from One Activity to Other in Android                    Creating Customized Dialogs in Android
Returning Result from Activity                                                   Creating Dialog To Collect User Input
Android : Service                                                                     DatePicker and TimePickerDialog
BroadcastReceiver                                                                   Using TimePickerDialog and DatePickerDialog In android

Menus In Android                                                                ListView:
Creating Option Menu                                                               Populating ListView With DataBase
Creating Context Menu In Android                                              Populating ListView with ArrayList
                                                                                               ListView with Custom Adapter

Toast                                                                                      Working With SMS
Customizing Toast In Android                                                       How to Send SMS in Android
Customizing the Display Time of Toast                                        How To Receive SMS
Customizing Toast At Runtime                                                  Accessing Inbox In Android
Adding Image in Toast
Showing Toast for Longer Time


TelephonyManager                                                            Storage: Storing Data In Android
Using Telephony Manager In Android                                          SharedPreferences In Android
                                                                                              Reading and Writing files to Internal Stoarage

Working With Incoming Calls                                       DataBase :  Introduction of SQLiteDataBase
How To Handle Incoming Calls in Android                                Working With Database in Android
How to Forward an Incoming Call In Android                            Creating Table In Android
CALL States In Android                                                          Inserting, Deleting and Updating Records In Table in Android


Miscellaneous
Notifications In Android
How To Vibrate The Android Phone
Sending Email In Android
Opening a webpage In Browser
How to Access PhoneBook In Android
Prompt User Input with an AlertDialog
How to Hide Title Bar In Android
How to show an Activity in Landscape or Portrait Mode only.
How to Set an Image as Wallpaper.


Android GestureDetector Example

In android can listen to the gestures and events performed by user on screen.

To listen the Gestures in Android we need to do 3 things
1: Create Class GestureListener which should extends GestureDetector.SimpleOnGestureListener
2: Override s all the callback methods of GestureDetector.SimpleOnGestureListener
3:  Bind the gestureDetector to GestureListener

 GestureListener.java


class GestureListener extends GestureDetector.SimpleOnGestureListener
{
   
       static String currentGestureDetected;
      
      // Override s all the callback methods of GestureDetector.SimpleOnGestureListener
      @Override
      public boolean onSingleTapUp(MotionEvent ev) {
          currentGestureDetected=ev.toString();
      
        return true;
      }
      @Override
      public void onShowPress(MotionEvent ev) {
          currentGestureDetected=ev.toString();
       
      }
      @Override
      public void onLongPress(MotionEvent ev) {
          currentGestureDetected=ev.toString();
      
      }
      @Override
      public boolean onScroll(MotionEvent e1, MotionEvent e2, float distanceX, float distanceY) {
          currentGestureDetected=e1.toString()+ "  "+e2.toString();
     
        return true;
      }
      @Override
      public boolean onDown(MotionEvent ev) {
          currentGestureDetected=ev.toString();
       
        return true;
      }
      @Override
      public boolean onFling(MotionEvent e1, MotionEvent e2, float velocityX, float velocityY) {
          currentGestureDetected=e1.toString()+ "  "+e2.toString();
        return true;
      }
}


MainActivity.java

public class MainActivity extends Activity
{
          
            private GestureDetector mGestureDetector;
            @Override
            protected void onCreate(Bundle savedInstanceState)
            {
                    super.onCreate(savedInstanceState);
                    setContentView(R.layout.activity_main);
                   
                    // Bind the gestureDetector to GestureListener
                    mGestureDetector = new GestureDetector(this, new GestureListener());
            }

            // onTouch() method gets called each time you perform any touch event with screen
            @Override
            public boolean onTouchEvent(MotionEvent event)
            {
                //method onTouchEvent of GestureDetector class Analyzes the given motion event
                //and if applicable triggers the appropriate callbacks on the GestureDetector.OnGestureListener supplied.
                //Returns true if the GestureDetector.OnGestureListener consumed the event, else false
.
               
                boolean eventConsumed=mGestureDetector.onTouchEvent(event);
                    if (eventConsumed)
                    {
                        Toast.makeText(this,GestureListener.currentGestureDetected,Toast.LENGTH_LONG).show();
                        return true;
                    }
                    else
                        return false;
            }
}


Gradient Drawable In Android

In android, we can create Gradient drawable and use them as background resource for TextViews, Buttons, ListView etc. Gradient helps to make the the GUI better and stylish.

Gradient Drawable Example


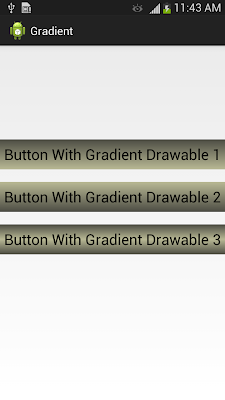
In this example I have created 3 gradient drawables.
Gradient Drawable are stored in drawable folder inside "res" folder of your app.

If "drawable" folder is not in "res" folder, create a "drawable" folder inside "res" folder and put all the gradient drawable xml files in it.


1st Gradient Drawable

Darker to Lighter shade


gradient_drawable1.xml

<?xml version="1.0" encoding="utf-8"?>
<selector xmlns:android="http://schemas.android.com/apk/res/android">
    <item>
        <shape>
            <gradient
                android:startColor="#4C4C43"
                android:endColor="#B8B894"
                android:angle="270" />
        </shape>
    </item>
</selector>


2nd Gradient Drawable

 Lighter to Darker shade


Gradient Drawable


gradient_drawable2.xml

<?xml version="1.0" encoding="utf-8"?>
<selector xmlns:android="http://schemas.android.com/apk/res/android">
    <item>
        <shape>
            <gradient
                android:startColor="#B8B894"
                android:endColor="#4C4C43"
                android:angle="270" />
        </shape>
    </item>
</selector>


3rd Gradient Drawable

 Darker at Boundaries  and Lighter in center


Gradient Drawable


gradient_drawable3.xml

<?xml version="1.0" encoding="utf-8"?>
<selector xmlns:android="http://schemas.android.com/apk/res/android">
    <item>
        <shape>
            <gradient
                android:startColor="#4C4C43"
                android:centerColor="#B8B894"
                android:endColor="#4C4C43"
                android:angle="270" />
        </shape>
    </item>
</selector>


In below layout I have used these gradient drawable as background resource of Button.


Gradient Drawable


<LinearLayout xmlns:android="http://schemas.android.com/apk/res/android"
    android:layout_width="fill_parent"
    android:layout_height="fill_parent"
    android:orientation="vertical" >

    <Button
        android:layout_marginTop="150dp"
        android:id="@+id/button1"
        android:textSize="24dp"
        android:layout_width="fill_parent"
        android:layout_height="wrap_content"
        android:background="@drawable/gradient_drawable1" <!-- set as background resource -->
        android:text="Button With Gradient Drawable 1" />
   
     <Button
        android:layout_marginTop="20dp"
        android:id="@+id/button1"
        android:textSize="24dp"
        android:layout_width="fill_parent"
        android:layout_height="wrap_content"
        android:background="@drawable/gradient_drawable2"
<!-- set as background resource -->
        android:text="Button With Gradient Drawable 2" />
    
      <Button
        android:layout_marginTop="20dp"
        android:id="@+id/button1"
        android:textSize="24dp"
        android:layout_width="fill_parent"
        android:layout_height="wrap_content"
        android:background="@drawable/gradient_drawable3"
<!-- set as background resource -->
        android:text="Button With Gradient Drawable 3" />


</LinearLayout>

Hide Title Bar In Android

In android we can hide the Title Bar. As you have seen there is not Title Bar in many game apps like Temple Run, Subway Surf etc.

Here is the code you need to write in your Activity.

public class MainActivity extends Activity
{

            @Override
            protected void onCreate(Bundle savedInstanceState)
            {
                     super.onCreate(savedInstanceState);
                   
                     requestWindowFeature(Window.FEATURE_NO_TITLE);
                     this.getWindow().setFlags(WindowManager.LayoutParams.FLAG_FULLSCREEN,
                     WindowManager.LayoutParams.FLAG_FULLSCREEN);

                     setContentView(R.layout.activity_main);
       
            }
}


See the snapshot, there is not title bar.


Monday, June 24, 2013

Android ImageSwitcher Example

The Android Development Tutorials blog contains Basic as well as Advanced android tutorials.Go to Android Development Tutorials to get list of all Android Tutorials.

ImageSwitcher


A ImageSwitcheris a specialized ViewSwitcher that contains only children of type ImageView. A ImageSwitcher is useful to animate an Image on screen.
        ImageSwitcher switches smoothly between two images and thus provides a way of transitioning from one Image to another through appropriate animations.

In the below snapshot we can see an Image is coming IN and other Image is going OUT


ImageSwitcher


Two types animations are required for  for ImageSwitcher to switch between the texts.
1: In Animation: with which  Image come in the Screen.
2: Out Animation: with which Image goes out from the Screen.

We can  provide following Animations

For In Animation
     R.anim.slide_in_left
     R.anim.fade_in

For Out Animation
     R.anim.slide_out_right
     R.anim.fade_out  


In Example, I have an ImageSwitcher and a button called "NEXT" , when user clicks on NEXT button   ImageSwitcher will switch between Images . The current Image will go OUT and next Image will come in with specified Animation.


ImageSwitcher Example:


In this Example I have following layout


ImageSwitcher


In the above layout, we  have an ImageSwitcher and a button called "NEXT" , when user clicks on NEXT button   ImageSwitcher will switch between Images . The current Image will go OUT and next Image will come in with specified Animation.


example1_layout.xml


<LinearLayout xmlns:android="http://schemas.android.com/apk/res/android"
    android:layout_width="match_parent"
    android:layout_height="match_parent"
    android:orientation="vertical">

 
   <ImageSwitcher
            android:id="@+id/imageSwitcher"
            android:layout_marginTop="50dp"
            android:layout_width="match_parent"
            android:layout_height="100dp"
            android:layout_gravity="center_horizontal" />
  
 
      <Button
            android:id="@+id/buttonNext"
            android:layout_marginTop="150dp"
            android:layout_width="fill_parent"
            android:layout_height="wrap_content"
            android:text="NEXT"
           />
    

</LinearLayout>


ImageSwitcherExampleActivity.java

   
public class ImageSwitcherExample1Activity extends Activity
{

            private ImageSwitcher imageSwitcher;
            Button btnNext;
           
           
            // Array of Image IDs to Show In ImageSwitcher
            int imageIds[]={R.drawable.image1,R.drawable.image2,R.drawable.image3,R.drawable.image4,R.drawable.image5,R.drawable.image6,};
            int messageCount=imageIds.length;
            // to keep current Index of ImageID array
            int currentIndex=-1;


            @Override
            protected void onCreate(Bundle savedInstanceState)
            {
                        super.onCreate(savedInstanceState);

                        setContentView(R.layout.
example_layout);
                       
                        // get The references
                        btnNext=(Button)findViewById(R.id.buttonNext);
                        imageSwitcher = (ImageSwitcher) findViewById(R.id.imageSwitcher);
                       
                        // Set the ViewFactory of the ImageSwitcher that will create ImageView object when asked
                        imageSwitcher.setFactory(new ViewFactory() {
                           
                            public View makeView() {
                                // TODO Auto-generated method stub
                               
                                    // Create a new ImageView set it's properties
                                    ImageView imageView = new ImageView(getApplicationContext());
                                    imageView.setScaleType(ImageView.ScaleType.FIT_CENTER);
                                    imageView.setLayoutParams(new ImageSwitcher.LayoutParams(LayoutParams.FILL_PARENT,LayoutParams.FILL_PARENT));
                                    return imageView;
                            }
                        });

                        // Declare the animations and initialize them
                        Animation in = AnimationUtils.loadAnimation(this,android.R.anim.slide_in_left);
                        Animation out = AnimationUtils.loadAnimation(this,android.R.anim.slide_out_right);
                       
                        // set the animation type to imageSwitcher
                        imageSwitcher.setInAnimation(in);
                        imageSwitcher.setOutAnimation(out);
                   

                        // ClickListener for NEXT button
                        // When clicked on Button ImageSwitcher will switch between Images
                        // The current Image will go OUT and next Image  will come in with specified animation

                        btnNext.setOnClickListener(new View.OnClickListener() {
                           
                            public void onClick(View v) {
                                // TODO Auto-generated method stub
                                 currentIndex++;
                                   // If index reaches maximum reset it
                                    if(currentIndex==messageCount)
                                        currentIndex=0;
                                    imageSwitcher.setImageResource(imageIds[currentIndex]);
                            }
                        });
                       
            }
           
}